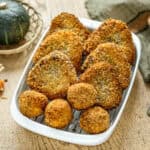
Servings: 8 croquettes
Kabocha Korokke (Kabocha Squash Croquette)カボチャのコロッケ
Kabocha Korokke are crispy Japanese croquettes filled with sweet, creamy kabocha squash. Learn how to make this easy Japanese comfort food at home.
Ingredients
Kabocha Squash Filling
- 400 g kabocha squash
- ¼ large yellow onion finely chopped
- 150 g ground beef and pork *Aibiki minchi or 100% beef
- 1 tbsp butter
- 1 tbsp sake
- 2 tbsp sugar
- 1 tbsp soy sauce
- pinch salt & pepper
Batter and Coating
- 4 tbsp all purpose flour
- 1 large egg
- 2 tbsp water
- 1½ cups panko breadcrumbs
- Neutral cooking oil, as needed for deep frying
Instructions
- Remove the seeds and stringy parts from the kabocha pumpkin, then slice it into even pieces.
- Place the pieces in a steamer with the skin side down and steam for 10 to 15 minutes, or until a fork easily slides into the flesh. *1
- Let the kabocha sit uncovered for a few minutes to release excess moisture.
- Transfer it to a large bowl, and mash while still warm. I like to leave a few small pieces for texture.
- Melt the butter in a pan over medium heat. Add the finely chopped onion and sauté for 3 to 4 minutes, or until soft and translucent.
- Add the ground beef and pork and cook for another 3 to 4 minutes, breaking it apart as you stir.
- Add the sake, sugar, and soy sauce and continue cooking until the meat is cooked through and most of the liquid has evaporated. *2
- Add the cooked onion and meat mixture to the mashed kabocha. Season lightly with salt and pepper, then stir until evenly combined.
- Let it cool completely before shaping.*3
- Divide the mixture into 8 equal portions and shape each portion into a flat triangle. You can also make small balls if you are preparing the korokke for a bento or snack.
- Combine the all-purpose flour, egg, and water in a bowl and whisk until you have a smooth batter. *4
- Dip each shaped korokke into the batter and let the excess drip back into the bowl.
- Place it in the panko breadcrumbs and gently press the crumbs over the entire surface.
- Sprinkle a little extra panko over any bare areas so the filling is completely covered.
- Heat the oil in a deep pot or pan to 170°C (340°F). Carefully lower 2 to 3 korokke into the oil at a time and deep fry for about 2 to 3 minutes, turning as needed, until crisp and evenly golden brown. *5
- Transfer the cooked korokke to a wire rack or paper towel to drain the excess oil.
Oven Option
- For an oven version, preheat the oven to 220°C (425°F).
- Before coating the korokke, lightly toast the panko in a pan with a small amount of olive oil until pale golden, then use it to coat the battered croquettes.
- Arrange the korokke on a baking sheet lined with parchment paper and bake for 15 to 20 minutes, or until hot and crisp. *6, *7
Notes
*1 I prefer steaming kabocha because it prevents the flesh from absorbing too much water. A drier filling is easier to shape.
* 2 After adding the sake, sugar, and soy sauce, cook until most of the liquid has evaporated. Too much moisture can make the filling difficult to handle.
*3 The filling becomes firmer as it cools and is much easier to shape, batter, and coat.
*4 I use this simple batter instead of coating each croquette separately with flour and an egg mixture. It is quicker, less messy, and helps the panko stick evenly.
*5 Do not overcrowd the pan because this will lower the oil temperature and can make the breading greasy. The filling is already fully cooked, so you only need to crisp and brown the coating and heat the center.
*6 Because the filling is already cooked, remove the korokke once the outside is crisp and evenly golden brown.
*7 The texture will not be exactly the same as deep-fried korokke, but pre-toasting the panko gives the coating better color and crunch.
Nutrition
Calories: 160kcal, Carbohydrates: 19g, Protein: 7g, Fat: 6g, Saturated Fat: 3g, Polyunsaturated Fat: 1g, Monounsaturated Fat: 2g, Trans Fat: 0.2g, Cholesterol: 38mg, Sodium: 231mg, Potassium: 270mg, Fiber: 1g, Sugar: 5g, Vitamin A: 713IU, Vitamin C: 6mg, Calcium: 43mg, Iron: 2mg