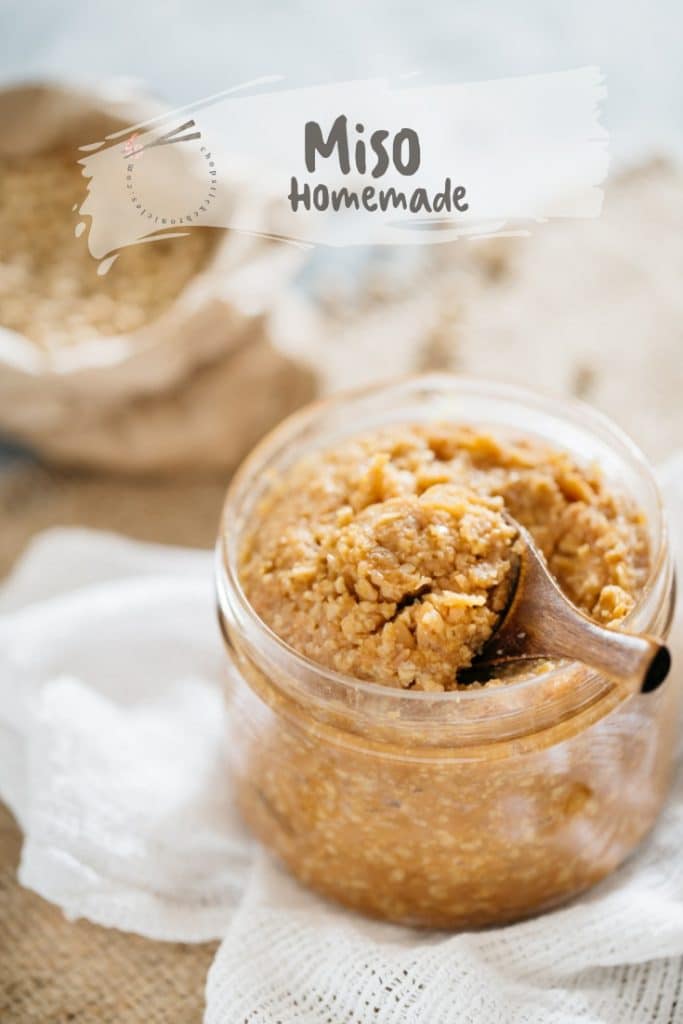
Miso is one of the integral ingredients of Japanese cooking. It is a well-known fermented food world-wide and can be purchased from supermarkets. Though it is still difficult to get ingredients for cooking Japanese dishes for some who live outside of Japan. Miso is actually easier to make than you think.

Types of Miso
Miso is a traditional and essential condiment of many Japanese dishes. It is an important part of Japanese cuisine. Miso is a fermented food and it is classified by the ingredients, colour, or taste. By ingredients, there are three types, rice (kome miso), burly (mugi miso), or beans (mame miso).
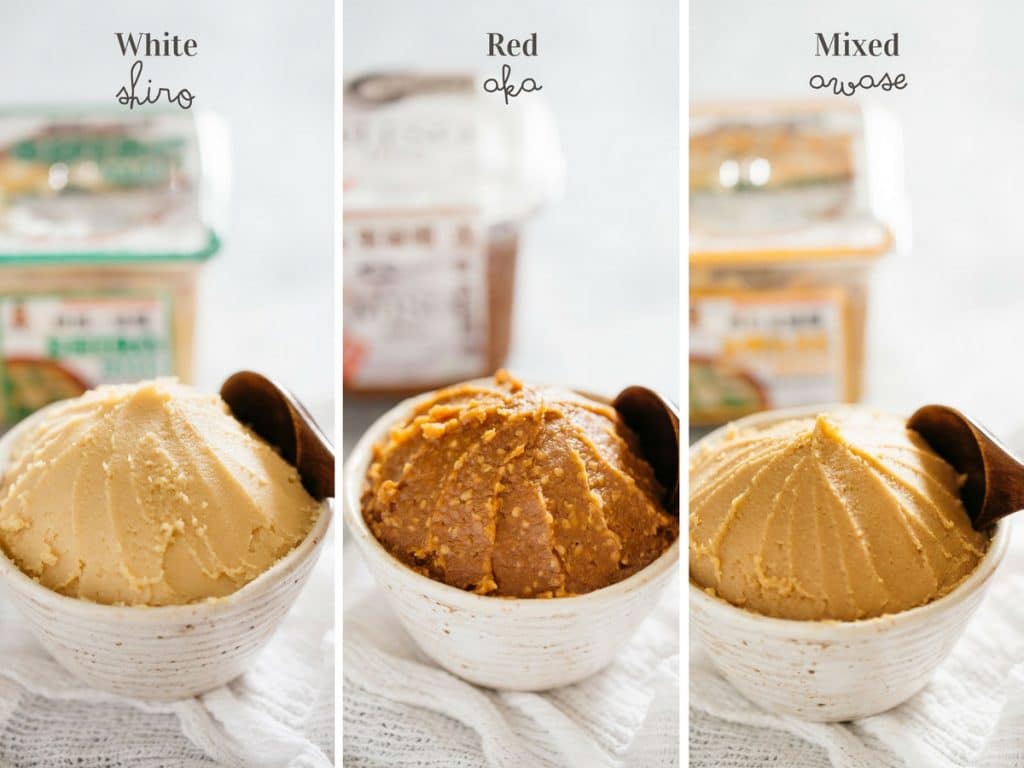
In terms of colour, there are white (shiro), red (aka), and mixed (awase) and this way of classification is the most commonly seen. For the taste, there are mainly either sweet or savoury/salty. Reference: Marukome Miso
Two regionally special sweet types
Sikyo miso on the left is Kyoto’s special sweet miso and it is often used for glazing fish and meat when grilling. Those dishes are called “Saikyo yaki” and are famous in Kyoto.
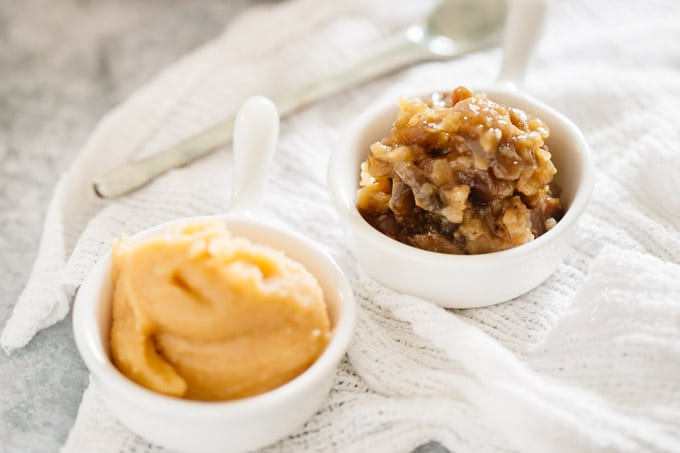
Kinzanji miso is Wakayama prefecture’s (where I am from) special sweet eating miso and this is my favourite. This paste is not for making miso soup or anything but for eating it as it is. It contains other ingredients like ginger, eggplants, and Shiso leaves. I buy this every time I go back to my hometown. (right on the photo above)
Hard to fail…
Making your own miso paste from scratch is not as difficult as you might imagine. It is actually hard to fail when making this condiment because 1. high percentage of salt (12-14%) kill bacterias. 2. Also Lactic acid bacteria changes the inside of the miso barrel into an acidic environment in which the bacteria cause miso rot and cannot tolerate sour (pH value around 5.o) environment.
How to make Miso
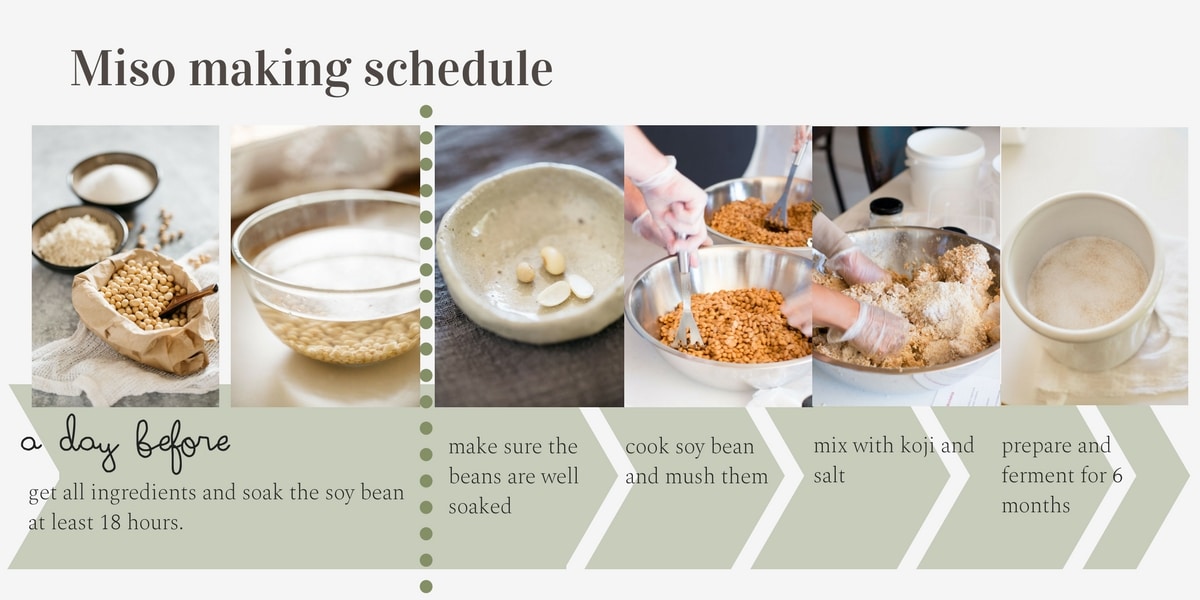
Making your own homemade miso from scratch is fun and is not hard to make. It only requires a few ingredients and a little patience as it takes about 6 months to mature. However, if you can not wait like me, you can start to use it after 3 months. It is totally worth the effort and time! See the making schedule above.
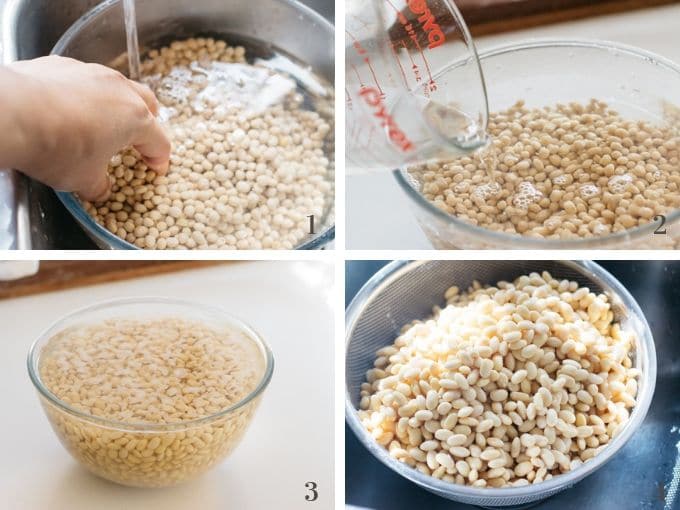
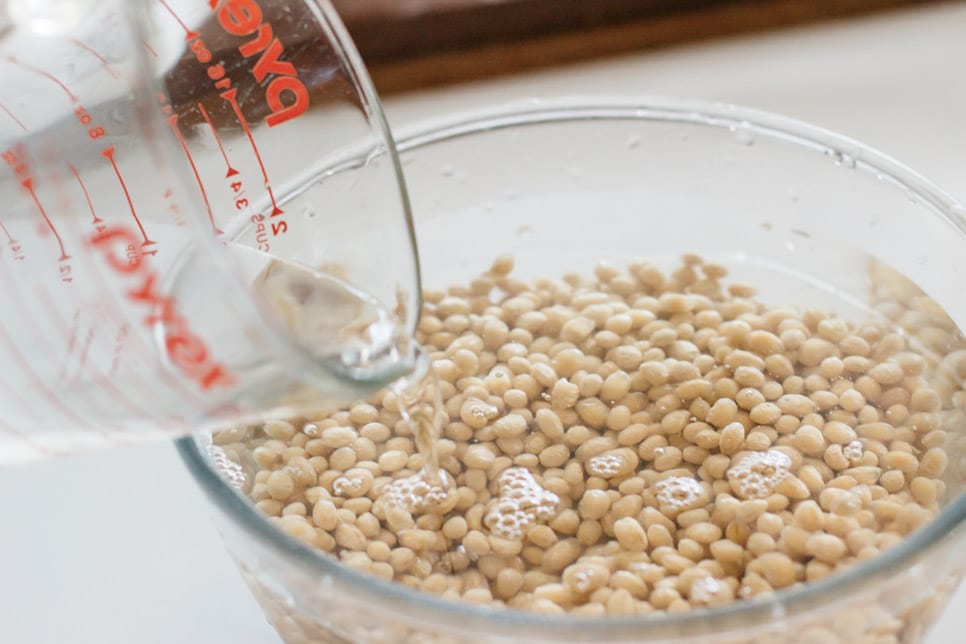
Making the miso takes about two days. The first day, you need to prepare the paste for fermenting; the soybeans need to be soaked for at least 18 hours, making sure that there is no core leftover to soak.
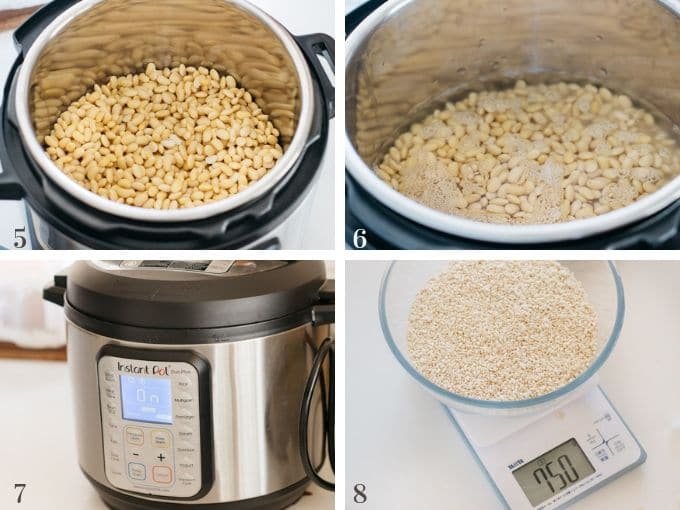
The next day, it needs to be cooked by either using a pressure cooker, which I did because you can make the process faster, or simmering for 3-4 hours. You need to cook the soybeans so that they are soft enough that you can mash soybean with your fingertips.
4 ingredients
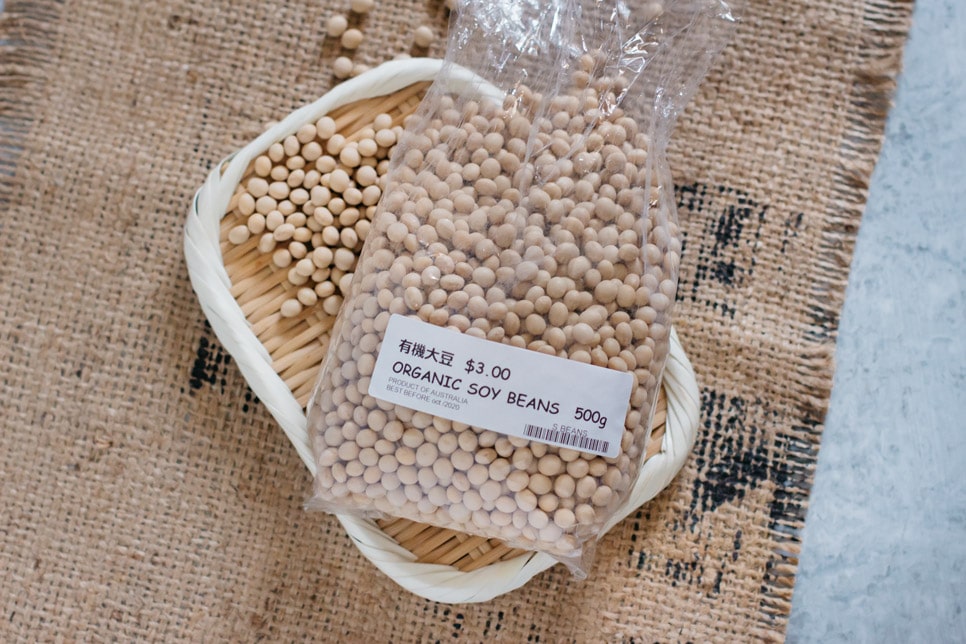
Dry soybeans
If you have choices, choose a larger grain of soybeans that are not cracked or chipped. These have a high water absorbency, good aroma and soften easily when cooked. All desirable characteristics for making a perfect paste. I purchase these from local Japanese grocery stores, whole food shops, and online shops.
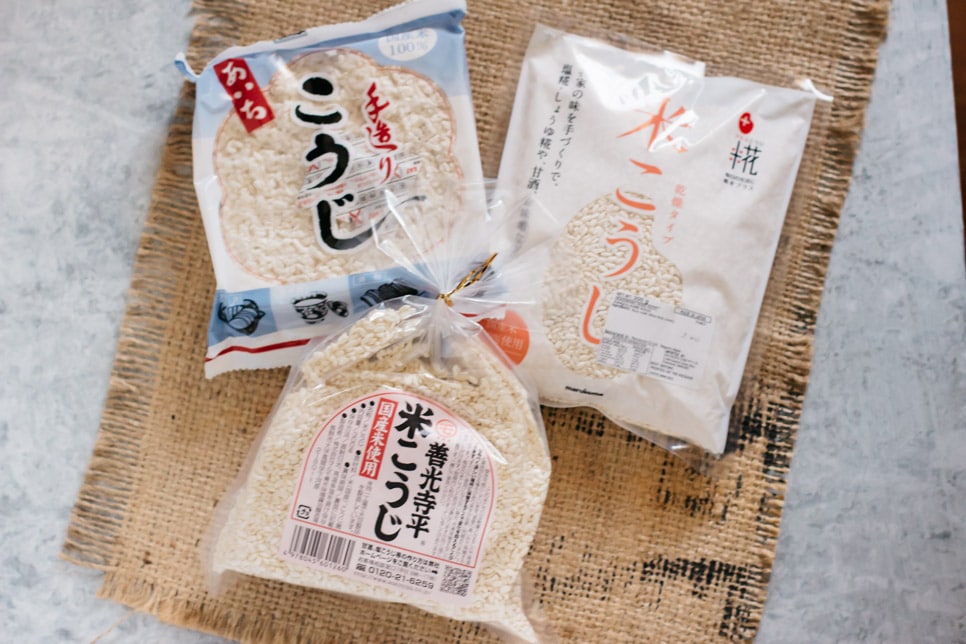
Rice Koji
Koji is steamed rice (and/or other grains such as barley) that have been inoculated with a fermentation culture, Aspergillus oryzae. Aspergillus oryzae is known as ‘koji-kin’ widespread in Japan naturally. When it is added to other ingredients, enzymes in the koji break down carbohydrates and proteins into amino acids, fatty acids and simple sugars to ferment. I use Rice koji (dry type) from local Japanese grocery stores or online shops.
Salt
Any salt will work, though sun-dried, unrefined natural sea salt which is rich in minerals will make the best flavoured and nutritious miso. Generally you need about 12-14% of the total finished product weight in salt.

Water
Any water can be used for cooking the soybeans. I actually have been using just Australian tap water for this. Though, fresh spring water is recommended for trouble free-fermentation. Because water containing chlorine or other chemicals may retard the activity of miso’s micro-organisms.
Ingredients calculator tool
The ratio of soybeans, koji, and salt determines the flavour of your miso. The more Koji that is used, the sweeter the miso gets. So to make the calculation easier, Chopstick Chronicles’ fantastic team created a calculator tool for you. All you need to do is input the dry soybeans amount you will use for the mixture.
Equipment you need
You need the following basic equipment; a large pot to soak and cook soybeans, A mixing bowl to combine rice koji and salt and cooked soybeans, a potato masher or electric mincer to mash the cooked soybeans. And also you need a vat for fermenting.
The size and type of vats
You can use food grade plastic, enamelled cast iron pots, earthwares or wooden tubs. The total amount of paste you wish to make determines the size of the vat you need. In general, the larger the vat, the easier to ferment, and better results. This is because the larger the vat, the smaller the surface area of the paste in contact with the container itself.

The best time to prepare
For the best result, preparing miso for fermentation in winter is the best season. Because 1.in those colder months, the air is relatively free of contaminating microorganisms. 2. Miso ferments slowly in the lower temperatures of winter and it makes a deeper flavour. 3. You could use freshly harvested ingredients (rice and soybeans) in Autumn. The fresher the ingredients, the better the flavour of course.
2 tips to avoid mold from growing
Two types of mold; aerobic and sole tolerance typically grow in miso vats. In order to avoid these molds to grow, 1. minimise contact with air. Making balls of the paste, thumping it down and packing it firmly is to expel any air pockets. Sprinkle salt over the smoothed miso surface. Place 20-30% of the total weight of the miso prepared, to cover the surface. 2. wipe the inside of the container with paper towel sprayed with alcohol such as vodka.
How to use homemade miso?
Obviously, this is the main and the most important ingredient of Miso soup. But it is also used for many different dishes and Japanese people use different types of miso for different purposes. The main ingredients for making any type of miso are the same but the process and the length of fermentation are what determines the final colour.
White miso paste
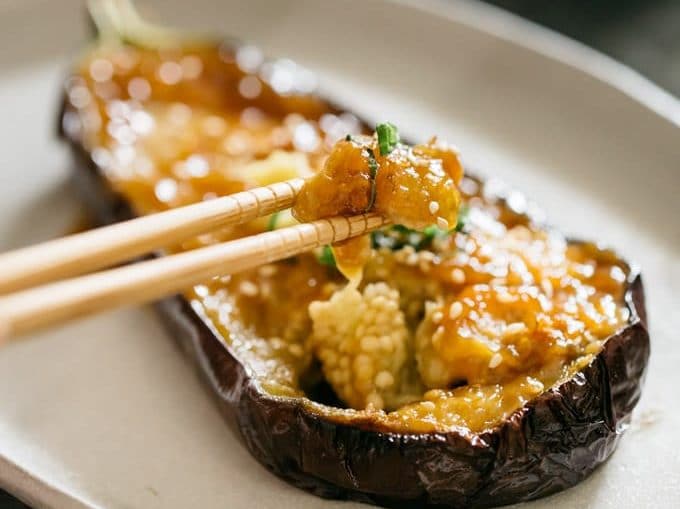
White miso paste is whitish in colour because the maturing period is shorter than red. The flavour of the white paste is sweeter and milder than the red paste so it is often used for salad dressing, for glazing such as miso dengaku like Nasu dengaku, and Onigiri Miso Butter or for baking and sweets such as Miso caramel.
Red miso paste
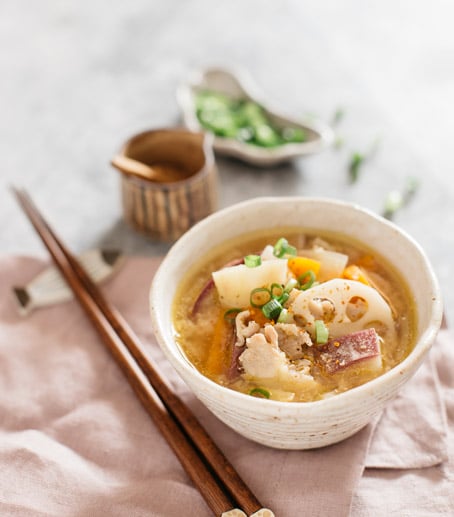
Red miso paste is matured longer than white so that the flavour is bolder and intense and the colour is much darker than white miso paste. This red paste is used for miso soup, noodle soup such as miso ramen, and miso nikomi udon, and for fish dishes such as Saba misoni because it will remove the fish smell.
Books about Miso
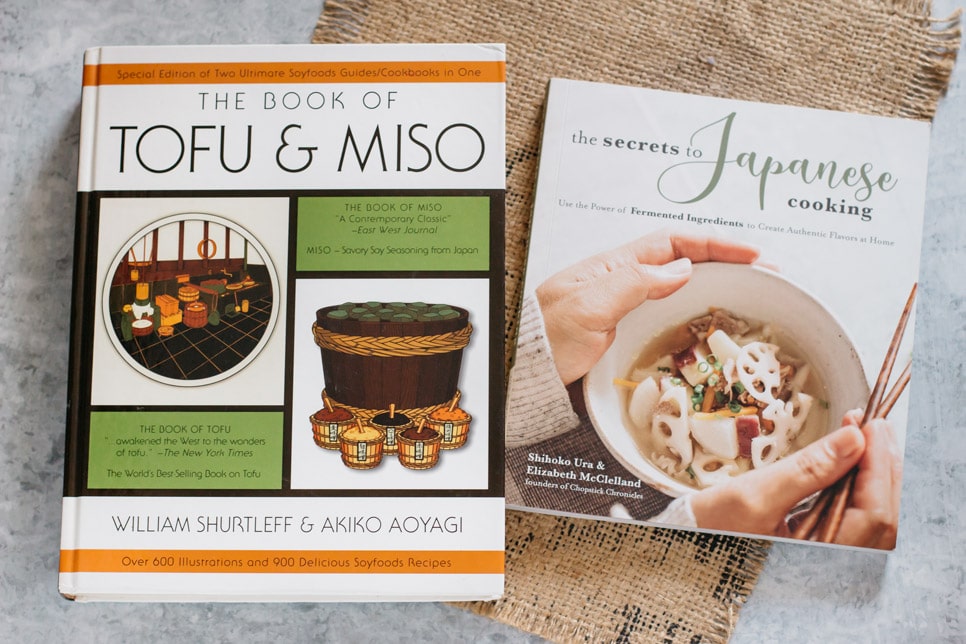
The book of tofu and miso is my bible when making this magical paste. This book is two books in one, but you can get The Book of Miso separately. Also, I have published the book The Secrets to Japanese Cooking: Use the Power of Fermented Ingredients to Create Authentic Flavors at Home
to share more authentic Japanese dishes using miso.
FAQ
Q: What is “rice koji’?
A: Rice Koji is steamed rice (and/or other grains such as barley) that have been inoculated with a fermentation culture, Aspergillus oryzae. You can buy them from Japanese grocery stores in dry form, or purchase them from online stores. In USA, Cold Mountain brand dry rice koji is easy to get.

Q: Mold is growing, what should I do?
A: Don’t panic. It is ok, just scrape them and transfer the miso into a different container to store. They are only growing outside and is quite normal.
Q: When can I start to use the miso?
A: You need at least three months to let the paste to ferment. After 3 months, you need to mix them in order to oxidise the miso. You can remove the weight and keep it somewhere cool.
Q: Do you have recipes that use miso?
A: Yes, I have a lots to share actually as I love it so much. Check out the following recipes as well as the recipes already mentioned in the post! Miso katsu don, Miso tamago(ramen eggs).

Stay connected
If you like the recipe please rate the recipe and leave comments below. Also don’t forget to follow me on Youtube, Pinterest, Facebook, Twitter and Instagram. This way you keep up to date with all the latest happenings on Chopstick Chronicles. Don’t forget to Sign up for a weekly newsletter so you never miss out on new authentic delicious Japanese recipes!
Affiliate disclaimer
The site and our mobile application may contain links to affiliate websites. We receive a small affiliate commission for any purchases made by you on the affiliate website using such links.
We are a participant in the Amazon Services LLC Associates Program. This is affiliate advertising designed to provide a means for us to earn a small advertising fee by linking to Amazon. com and affiliated websites.

Miso 手前味噌
Video
Equipment
- a large mixing bowl to soak soybeans
- A large pot to cook soybeans or a pressure cooker
- a potato masher or a stand mixer with mincer attachment
- a large vat to set miso ferment
- alcohol to wipe the the vat *6
Ingredients
- 200 g dry soybean
- 450 g rice koji
- 130 g salt
- 1/2 cup the water soybean cooked in
- 2 tbs salt for sprinkle
Instructions
- Wash the dry soybeans under running water until the water become clear.
- Soak the washed dry soybeans for over 18 hours
- After over 18 hours have passed, drain the water and place the soaked soybeans in a pressure cooker. *1
- Add enough water to cover the soybeans, lock on the lid in place and select pressure cooker. *2
- Set the timer to pressure cook for 5 minutes. When the 5 minutes is up, let the pressure come down naturally.
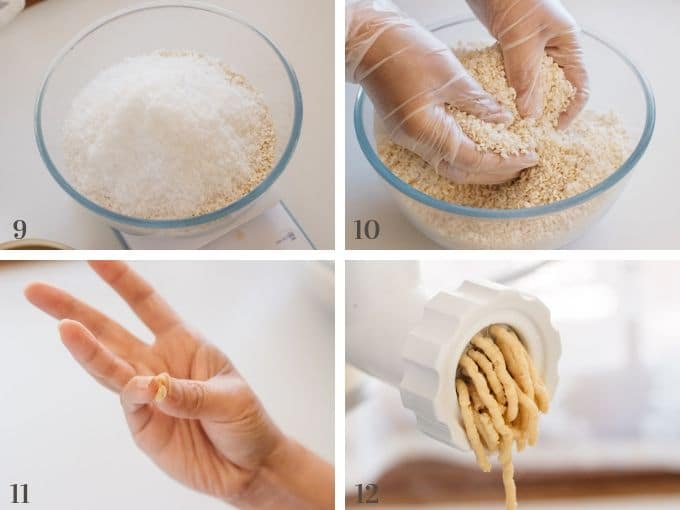
- While the soybean is being cooked, place salt and koji in a mixing bowl and combine them well and set aside.
- Pick one bean and check if you can squish the bean with your finger tips. If it can be squished, it is the right softness to mash.
- Mash the cooked soybean. I used a stand mixer with a mincer attachment, but if you don’t have it, just use a potato masher and mash them finely.
- Place the mashed soybean in a large mixing bowl while it is still hot and add koji and salt to the bowl. *3
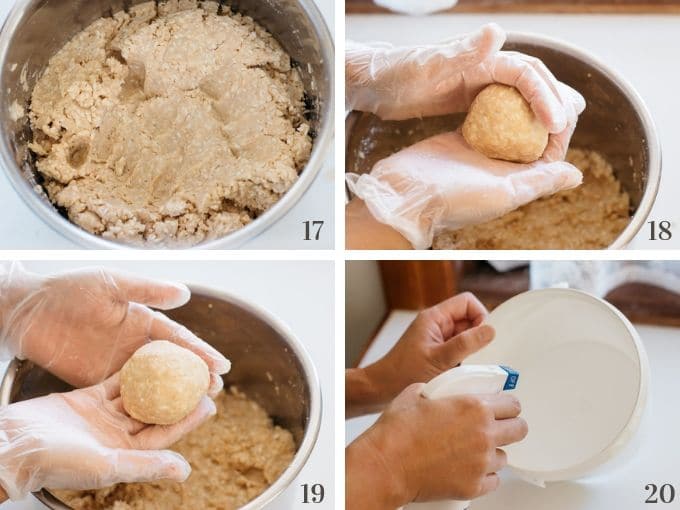
- Mix them well with your hands and add some liquid if necessary. I add about 1/2 cup of liquid.
- Make the mashed soybeans into baseball sized balls.
- Slam the mashed soybean mixture balls into a container that is going to be used for fermenting 2-3 balls at a time and press them compactly in order to let any air bubbles out. Repeat the process until all soybean balls are compressed into the container.
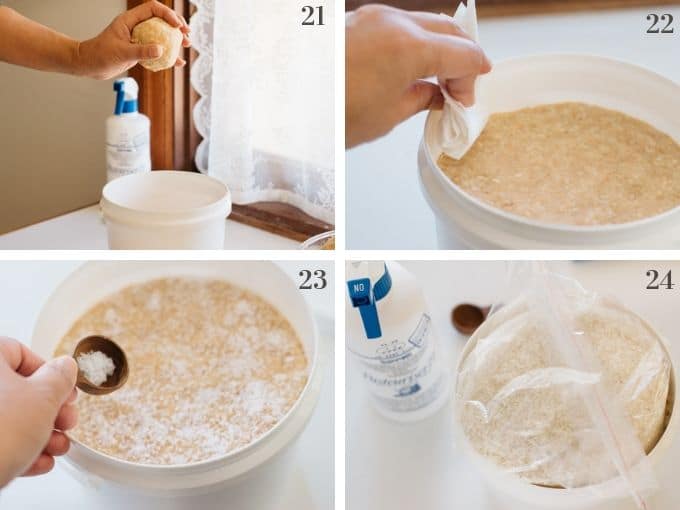
- Smoothe the surface and wipe off any soybean mash from the container.
- Sprinkle salt to cover the surface.
- Place 20% of the mixtures weight over the salt sprinkled surface. I used salt in a ziplock bag. *4
- Cover the container with cling wrap and place a lid.
- Store the container in dark and cool place for at least 3 months. Write the date prepared on the lid.
- After 3 months, open the lid, remove the weight and turn the mixture with an wooden spatula.
- Smooth the surface again and place a cling wrap on top.
- Place the container back to a dark and cool place for another 2-3 months.
- After 2-3 months, transfer the container to a cooler place like the fridge in order to stop the Miso from over fermenting. *5


Hi Shihoko-san.
Finally I find a recipe for miso that I can understand 😅 Thank you for sharing your knowledge and love for cooking.
I’m Portuguese and I usually have a difficult time with finding foreign ingredients but recently I found a new store that maybe, just maybe, will have Koji.
Thank you again!
Hi Carolina, Thank you for leaving comment and Five star rating. I am glad to know that my little Japanese food blog is useful for someone in Portugal. That is just fantastic!
Hi Shihoko-san.
I am the one that is grateful 🙏
I am a very anxious person and cooking oriental dishes that are complex, is awesome for me.
Your blog is just perfect because it includes many tips, pictures, videos… I have some books but it is not the same.
I’m going shopping this Friday, so I’m looking forward to see what I can find and cook! Found some Nuruk last month and I am trying to make Korean rice wine 💪
Thank you 🙏
Hi Carolina 😀 I am glad that my Japanese food blog is useful for you.
Hi Shihoko! Thank you for sharing your recipe for miso, I love your website! I made some miso (one batch with soy beans and one batch with garbanzo beans) back in October 2019. A tiny bit of mold has grown on the garbanzo miso, is it OK to just remove it and keep fermenting as is? Also, I noticed that neither batch never produced any soy/garbanzo sauce. Is this normal? Please let me know, thank you very much!
Hi Monica, yes that’s ok. And also some miso produce tamari, some never make depends on how moist when the miso set. If yours didn’t make, it is perfectly normal.
OK perfect, thank you so much Shihoko!
You are welcome 😀
It’s a nice recipe, but I just wanna correct one common misconception: salt does NOT kill bacteria, it inhibits their growth.
I am teaching use of miso, coming up, If my students cannot find miso paste in their grocery, what can I tell them about dried equivalencies? Many times, powdered miso is available where paste is not.
Hi Karen, it depends on what you are using miso for. If it is miso soup, about 1 tbsp of miso powder makes 1 cup of miso soup, though this is just generally speaking so you need to follow the direction of the packages. If you are making like glaze then you need paste texture so add water or dashi a little bit at a time till you get the miso paste consistency that you would like. Hope this helps if you have more questions, please don’t hesitate to ask 😀
I just saw this and want to try it-I was just wondering if you can freeze this and if so how long will it last in the freezer? I
Hi Michelle, You can keep it in fridge not in freezer. It last long time.
I made my first batch of miso three months ago and I’ve just checked it. INothing’s happened! It hasn’t fermented at all, it’s just like when I fist made it. It’s been in the garage over the winter – could it be that it’s too cold out there?
Hi Badmoodbear, what’s the temperature like there? Yes it may be too cold.
Thanks for the reply. It’s quite cold here in Yorkshire in the winter! Near freezing temperatures in my garage. I’ve brought the miso indoors now, I hope it will start to ferment
Oh Ok, hope it will start to ferment soon:D
Hi there,
I just opened my miso up after nearly 4 weeks, and there’s some white mold on the top. I scraped it off and put the miso into a different covered plastic container. How do I know if I got all of the air pockets out? Are really small ones okay? Also, do I have to weight it down? Thank you!!
Hi Laura, 4 weeks is a little bit early to change the container. I would leave it minimum 3 months. To minimise the air pockets, you need to make baseball size balls and throw them into the container then compress them all together as much as you can. Yes you need about 20% of total miso weight. So if your miso weighs 1kg you need about 200g of weight.
Hi,
Thank you for the great post. I wonder if I can make miso paste from okara? Thanks!
Gloria
Hi Gloria, I have researched it as I have never made but you can with soy milk.
Typically white is not mold but kahm yeast, naturally is in the air, which is pretty harmless unless left unchecked. To prevent minimize exposure to air and resist peeping, Just lightly scrape it off. Should be fine. Also I’ve added just a tad of fermented sauerkraut juice to jump start mine in the past or some miso from previous batch. Fermentation is all about time and temperature.
Thank you Mike for the information 😀
Hi, I was wondering if it is possible to use miso itself as a starter for new miso instead of the koji-rice. Do you have any experience with that?
Greets, Moritz
Hi Moritz, No I have never used left over and so I am not sure. I have researched it a bit there is a forum.
Hi shigeko,
I cane back from fukuoka in middle of November n made my homemade miso which we were given from one of tours with fukuoka convention. Today I notice my miso container which I have sarah wrap n cheese cloth as a cover n its puffy. M afraid to open. Any suggestions. I grateful appreciated.
Thank you
Mitsuko
Hi Mitsuko san, or Hazel? When did you set the miso? The end or beginning of November? If it is beginning, it is now about three months. You can remove cling wrap, and cheese cloth. If there is mold has grown, that’s ok remove them with a spoon Turn Miso around. You can start to uses or let it mature farther in place where the temperature is cool (but not in fridge) and gets no direct sunlight.
Will wait till after the 20 of this month. As it’s my first time I have it in a 48oz plastic jar as didnt want to transfer when i got more infor about containers.
Only concern about my cheesecloth puffing up which I have it secure w rubberband.
Will transfer to ceramic jar the 20th
Again. Domo arigato to my rely
You are welcome 😀
Hi Shiho
Finally transferring my miso to small containers. After 3 months, it fermented with no problems. It tasty awesome.
Thank you for sharing your advise
You are welcome Hazel 😀 I am glad that your miso taste great!
Could you estimate temperature range (Fahrenheit) for cool place? Thanks!
Hi Randall, somewhere temperature does not change much in one day is good. If the temperature is below 15°C (59°F), fermenting activity will not happen, and also somewhere the temperature always above 35°C (95°F) will not be suite. Find somewhere avoid direct sunlight and cool place where the temperature does not change much in a day. 😀
Hello Shihoko
What a helpful site, thank you. I made a batch of miso a year ago and have just opened it to taste. It’s tastes great, I think. On reading all your information I realise it has been one year and I never turned the miso at all! I do have a few air pockets but no mould is present, thank goodness. Is it ok to put it into smaller jars and must they be sterilised? Is it then necessary to store in the refrigerator? There is a darker, salty layer on top, should that be mixed in? Thank you so much, I intend on making more very soon though from what I read maybe I should wait until the cooler weather!
Hi Joanne, welldone. Yes if you like the taste of the miso you made, you should mixed darker salty layer in and put it in sterilised smaller jars and keep them in refrigerator so that it slow down the fermentation process. Yes cooler weather is the most suitable time to set miso 😀
I’m so happy I was able to find an easy miso recipe to follow!! I hope to start the miso process this weekend, but I’m not sure what calculation to use. The Miso ingredient quantities calculator is awesome, but if I want to make the red miso to use for miso ramen, which calculation should I use?
Also, I’m in Okinawa, so any tips you can provide for the warm, humid climate here would be greatly appreciated.
Thank you for sharing so many awesome recipes!
Hi Anthony! Lucky you that you are in Okinawa. A lots of great food. Anyway you can use Mid, or dry. I use mid calculation usually. The best news for you is that it (Winter) is the best time to set miso. The climate in Okinawa and Brisbane where I live now is quite similar, so if I can make it, you can make it too. Just keep them in dark cool place but not in fridge.
Hello,
I would like to prepare two 1 gallon fermentation crocks with pre-fermented miso. Can you give me an idea of how many kilo/grams of dry soybean weight I would need to accomplish this so I can use the calculator to determine the other ingredient weights? Thank you!
Hi Steve, you need about 700g dry soybean for sweet miso, 850g for medium and 1000g for dry miso.
Amazing photos very professional would love to know how you do tit! :3
Thank you Susan:3,
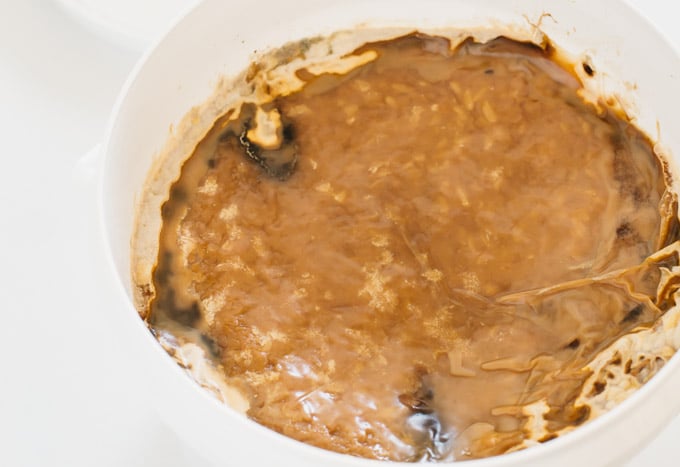
I like this recipe and instructions a lot! The instructions are very clear, thank you for sharing! My batch just finished fermenting. I live in the US and used Cold Mountain koji. My containers were old yogurt containers with lids, the larger ones not the tiny cups. The yogurt containers make it difficult to “slam” the soybean mash but with a little patience, you can push the mash tightly to ensure no air gaps. My miso didn’t release any tamari. At the 3 month turn, the mixture turned a darker shade of tan and smells a bit funky–think parmesan cheese. It also has a pastier consistency. At the 6 month mark, the color is a bit darker and the smell a bit stronger, but still nice. It’s important to sprinkle salt on the surface evenly. At the end, areas that didn’t quite get enough salt developed the darker mold spots. The containers with the tighter-fitting lids developed the darker mold.
Congratulations and well done on your homemade miso! It is better than anything else. If it developed mold, just remove it and your miso is fine because you mentioned that no air pocket so the mold grow just on the surface 😀 Yay!
Wow this was a lot more simple than I thought it would be! Thanks for sharing your tips, great recipe!
You are welcome Noelle 😀
This is so cool! Very informative and easy to follow!
Thank you Whilemina 😀
Hi! This seems like an awesome recipe – but I had already started a batch from a book recipe by time I found it this time last year ^^” but I do have a quick question if you’re willing to answer it. My miso is almost done fermenting, and I’m wondering if there are any distinct warning signs that you are aware of for if it was a failed project? I do know I’ve gotten very little Tamari off of mine, whether or not that’d have a major impact, and there’s a bit of a salt build up along the sides of the pan and on my weight (a large can of spinach) but are there any distinct smells or visuals to look out for if it’s gone sour?
Hi Haley, I have been making my own miso for long time but apart from mold grow, making miso never failed so far. I think Miso is actually difficult to fail. If you followed the instruction, your miso should be ok. Not producing tamaati, salt building up is ok. Please let me know when you turn upside down at about three months how your miso is going 😀
hello!
I love miso very very much but my husband recently found out that he is allergic to rice! I really want to be able to eat Miso with my husband so I wondered if there is any replacement for Rice Koji? or an alternative I can use?
Thank you so much!!
Hi Brytanny, I am not sure how to make quinoa koji, but people allergic to soy, wheat and rice “Quinoa miso” is available to purchase in Japan.
This sitehttp://www.e-kanekoya.com/s_miso_ma-kinuamiso.htm is in Japanese language but for just for your reference. If I could help any further please let me know. I will figure out how to make koji with Quinoa 😀Hi shihoko,
Quick question regarding soy bean. Aussie living in Indonesia and have access to fresh soy beans. Would this recipe work for fresh beans instead of the dry soy? I would assume there would be an adjustment with ratios as the fresh beans would already have a higher water content and once cooked possibly higher. Just curious to try with freshies
Hi Josh, yes I think so. I have never tried with fresh but theoretically should be work. And yes you need to adjust the amount of salt and Koji. Salt is usually calculated about 12% of koji and soy bean. When dry soybean 100g is soaked overnight(about 8 hours) they become 2.3-2.4 times heavier. So it will be about 230-240g. So let’s say if you have about 500g soy fresh soy beans, you need 300g Koji and 96g of salt. I would try it out with that amount or may be smaller amount and see how you go as it takes at least 3 months to see the result 😀
Thank you for the info, I’ll give it a go in the coming weeks and update on the progress. i like a good challenge!
You are welcome, yes please keep me informed and good luck 😀