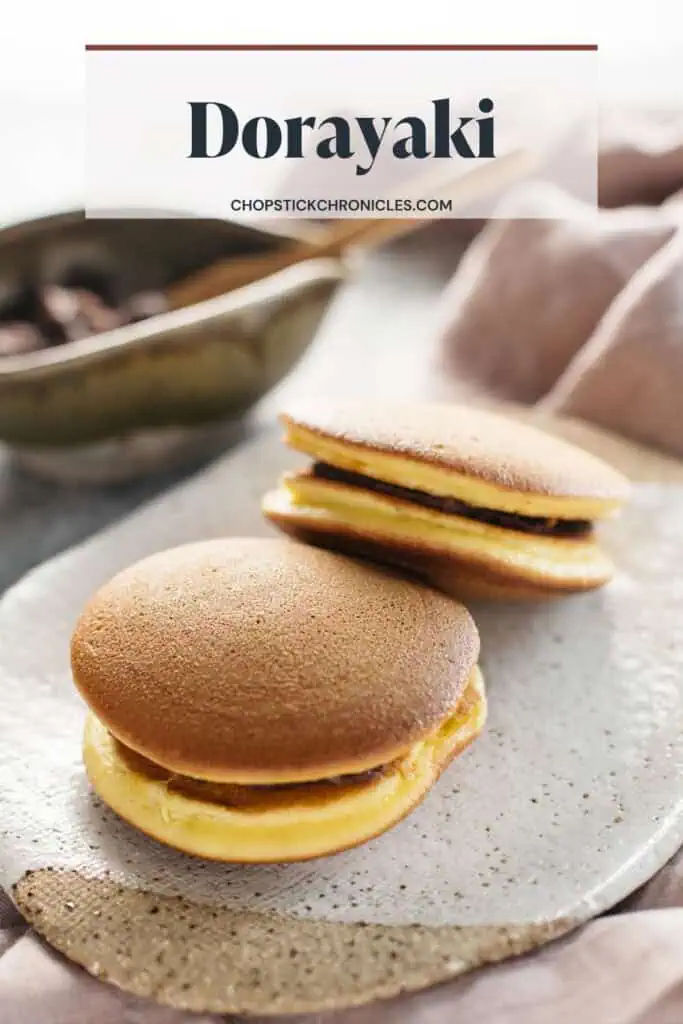
Dorayaki is one of the well-known and popular traditional Wagashi (Japanese sweets). These little delights have a delicious subtle flavour palette without an overbearing sweetness, which makes it hard to eat only one.

The honey pancake and azuki bean (red bean) paste are a perfect pairing for a simple yet irresistible treat.
What is Dorayaki?
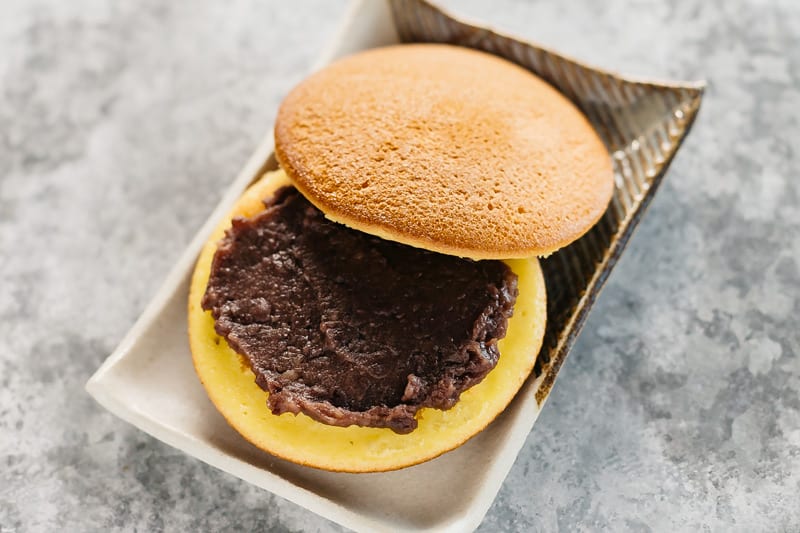
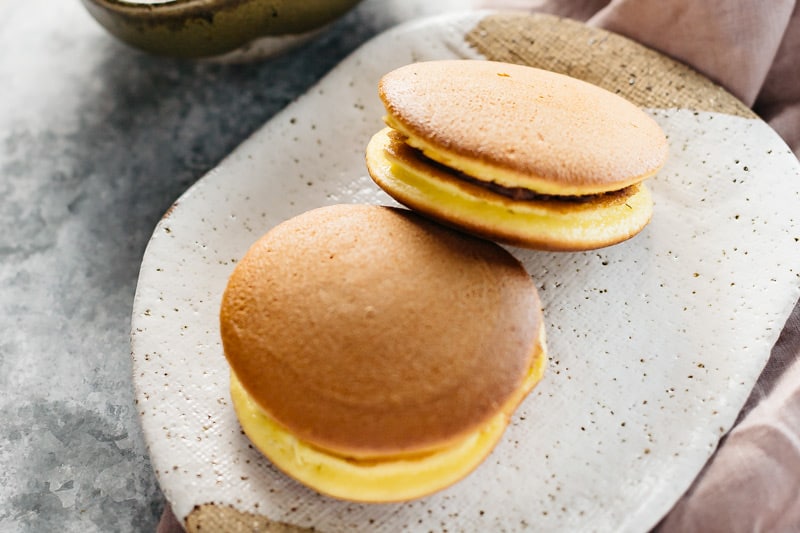
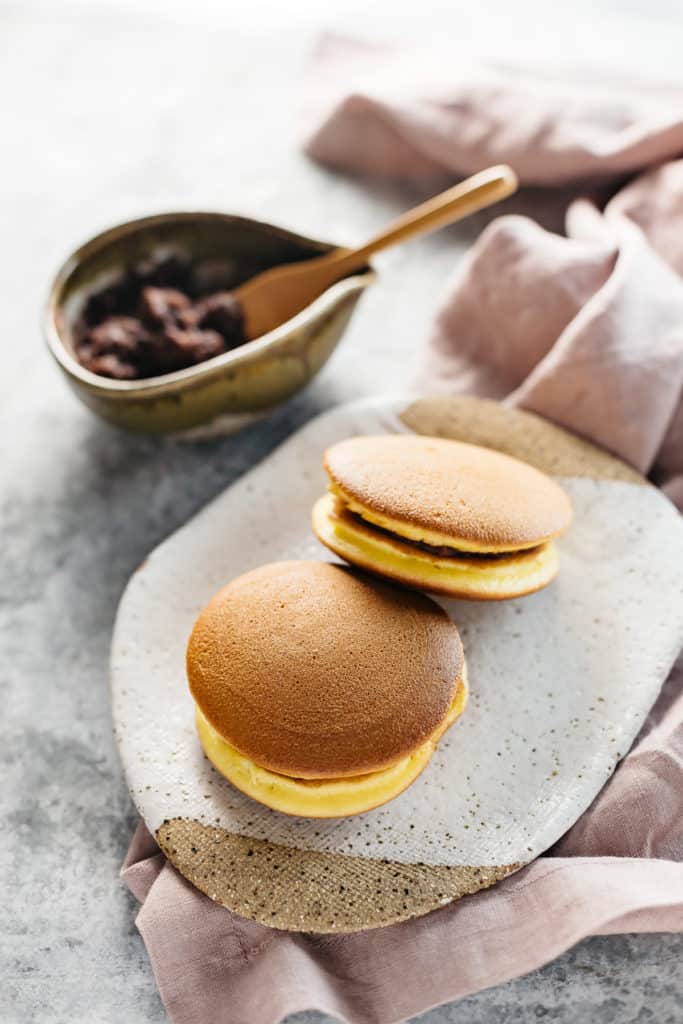
Dorayaki (doh-ra-yaki) are cute and tasty traditional Japanese sweets made from sweet azuki bean paste sandwiched between two fluffy honey pancakes. However, they do differ a bit from regular pancakes. The cake batter of Dorayaki contains honey and mirin so the flavour and texture of Dorayaki is more like the Japanese “Kasutera” sponge cake.
What is Dorayaki made of?
You need the following ingredients to make Dorayaki
- All purpose flour
- baking powder
- sugar
- egg
- honey
- mirin
- water
- Azuki beans paste (also known as sweet red bean paste)

When was Dorayaki invented?
Dorayaki originated in Japan many years ago in the early 1900s and is believed to have been based on the shape of a gong (meaning “dora” in Japanese) that was left by a samurai. The longevity of this traditional dessert shows just how popular and delicious it truly is.

There are a few theories of where the name originated. One is that the origin of the name comes from the fact that the shape is similar to the gong of a Japanese musical instrument called “Dora”. Another theory is that the cake was baked on this musical instrument, hence became to be called “Dora Yaki”.
I am from the Kansai region of Japan. In Kansai, Dorayaki is known as “Mikasayama Manju”. Because the famous mountain Wakakusayama in Nara prefecture is also called Mikasayama and the round shape of Dorayaki look like the shape of the gentle slope of that mountain.
How to Make Dorayaki?
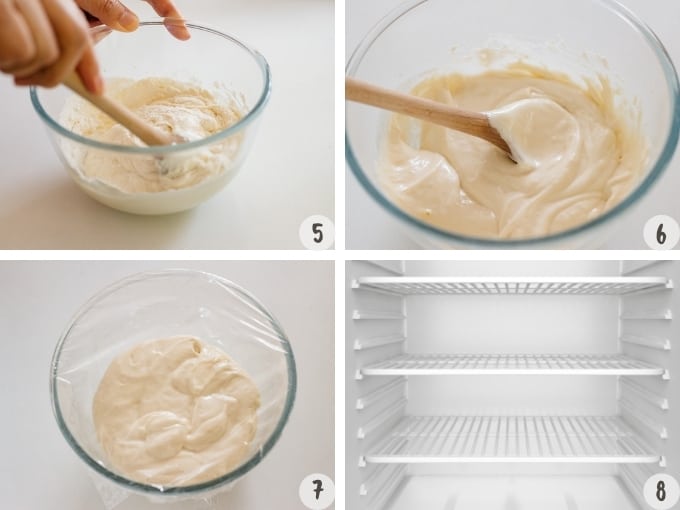
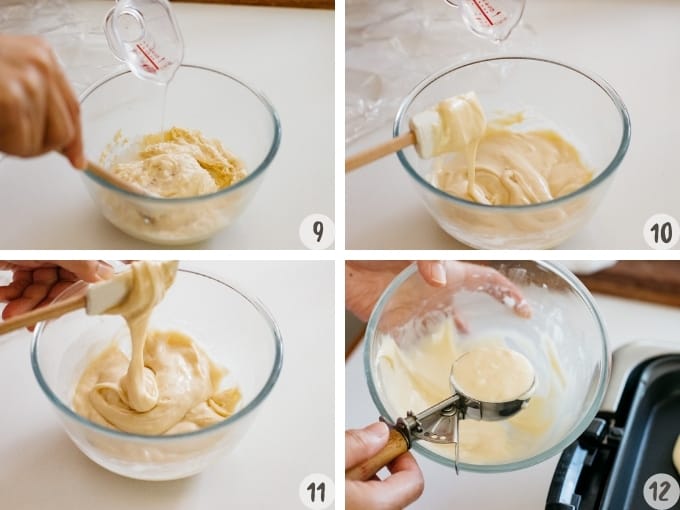
- Make batter – Sift flour and baking powder and set aside. Whisk egg, sugar, honey, mirin together till the colour becomes pale and fluffy. Fold the flour in till you don’t see any flour left. Wrap the mixing bowl with a cling wrap sheet and refrigerate for 30 minutes to rest.
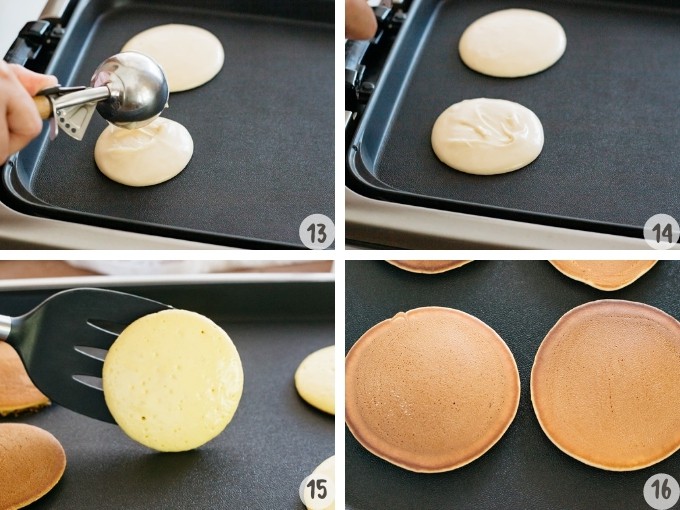
- Fry the batter – Scoop out the batter on to a hot plate on 320°F (160°C) and cook one side for about a minute or bubbles form. Flip it over and cook the other side for a minute. Turn the heat off and remove the cakes onto a cooling rack or a plate. I use a hot plate but you can use a sandwich press or a frying pan.
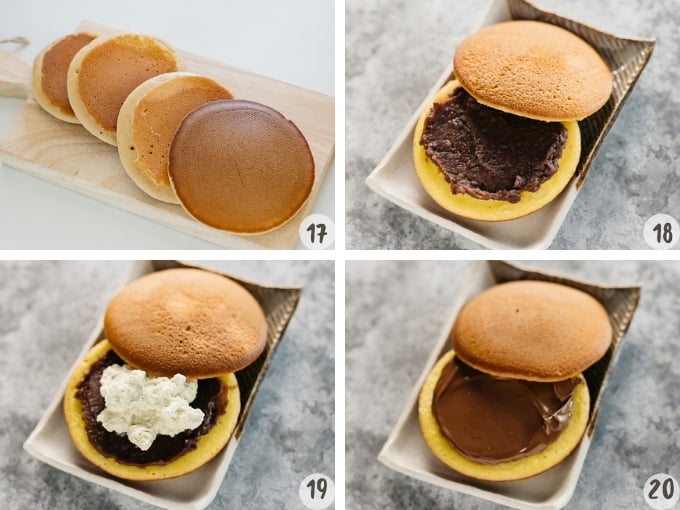
- Sandwich sweet Azuki bean paste – Spread sweet azuki bean paste on one dorayaki cake and place another dorayaki cake onto the other to sandwich the sweet azuki bean paste.
What to Have Dorayaki with?
Dorayaki is a finger-food sweet that makes it a perfect snack to eat with your hands. It’s portable and easy to pack so you can take it on a picnic or work or school. It’s also a lovely treat to enjoy with Matcha latte or Hojicha roasted Japanese tea for a relaxing Japanese-style afternoon or morning tea.
2 Tips to Make Perfect Dorayaki
- Let the pancake batter rest in the fridge and add water to smooth the batter.
- Use an ice cream scoop to make sure each pancake is the same size.
Filling Variations
Traditionally, Dorayaki filling is Anko, the sweet azuki bean paste. But I am aware that if you didn’t grow up with this flavour like me, some people don’t like it. Dorayaki has evolved and nowadays I see many different filling variations. The one quite popular filling is Nutella! My favourite is chestnuts in azuki bean paste. Other popular ones are custard, fresh cream, or a combination of those fillings. Be creative and find your favourite fillings!
Other Japanese Sweets to Check
How long Do Dorayaki Last and How to Store Them?
Dorayaki should last fresh for a couple of days if stored properly in an airtight container. However, if you are like the famous cartoon character, Doraemon, and want to make as many as you can and store them for longer so that you can enjoy Dorayaki every day. Great news because you can! Many Japanese sweets can be stored frozen. Wrap them individually with cling wrap then put them in a zip lock bag. It can be stored in the freezer for a month.
FAQ
A: This is a sweet treat that I would indulge in once in a while.
A: No because this recipe uses flour but you can substitute this for gluten-free flour.
A: No, this dorayaki batter recipe uses egg so this is not vegan.
Stay Connected
Here is the recipe. When you made this and liked it, please leave a comment below and rate the recipe.
If you like the recipe please rate the recipe and leave comments below. Also don’t forget to follow me on Youtube, Pinterest, Facebook, Twitter and Instagram. This way you keep up to date with all the latest happenings on Chopstick Chronicles. Don’t forget to Sign up for a weekly newsletter so you never miss out on new authentic delicious Japanese recipes!
Recipe Measurement

Dorayaki どら焼き
Ingredients
- 150 g all purpose flour (1 cup)
- 1 tsp baking powder
- 2 eggs Large eggs weigh 50g each
- 110 g caster sugar
- 1 tbsp honey
- 1 tsp mirin
- 40 ml water
- 200 g sweet azuki bean paste *3
Instructions
- Sift flour and baking powder and set aside.
- Place eggs, sugar, honey and mirin in a large mixing bowl and beat all together until the egg mixture becomes pale whitish in colour.
- Fold the sifted flour and baking powder in and combine till you don't see any flour.
- Wrap the mixing bowl with cling wrap and rest it in the fridge for 30 minutes.
- After 30 minutes rested in the fridge, add 40 ml of water to smooth the batter. *1
- Set the hot plate 320°F (160°C). *2
- Pour 1 scoop of ice cream scooper of the batter onto the pan. If you are using a frying pan, cook one or two at a time and if you are using an electric pan, you can make a little more at once.
- Place a lid on and cook one side for one minute and 30 seconds or when you see bubbles start to form, flip it over with an egg flipper.
- Cook the other side for about one minute.
- Remove the cake off the heat and place it between the folded kitchen towel to avoid the cake becoming dry.
- Keep making the cake until all batter is cooked.
- When the cakes are cooled down, spread sweet azuki bean paste on one cake and sandwich with another cake and repeat it to make 8 Dorayaki.


Finally a good recipe with good proportions.I reduced sugar (by ~20 grams ,my tsubuan/koshian mixture is sweet enough ) mirin wasn’t available. I took a bit more honey.Thanks for uploading the recipe.The dorayakis succeeded well! 🙂
YB
Querida Shihoko, fiquei feliz de encontrar um blog especifico de Dorayaki. Parabéns! Penso em começar a aventurar-me nessa receita. Uma dúvida, porque utiliza-se mirim na receita, qual a função dela?
Grata, abraços!
Susana
Love this recipe, it works so well! I have been making dorayaki and sending them to loved ones during this pandemic. I love redbean, but I appear to be the only one I know who does! So I’ve been using a nutella whipped cream as a filling to please the masses. Thank you for posting this and making dorayaki accessible
Perdón, con todo respeto quiero hacer una crítica constructiva, en lugar de levadura debería decir polvo de hornear, ya que éste es un compuesto químico y no levadura.
La página me parece extraordinaria, muy agradecida por tu esfuerzo y dedicación.
Ya hice anko que me gustó mucho y mañana hago dorayakis y comento.
Nuevamente muchas gracias
My batter came out very thick, and the 110 grams of sugar seemed like a lot. The cakes burned really fast on the griddle, and texture came out dense and like crispy. Maybe I did it wrong…
Hmmmm Yes Tiffany I think so. Sorry it did not turns out great snack for you.
Can I let it rest overnight or is that too long?
Hi Jo, no it will be fine 😀
This is such a great recipe. I have been hooked on creating authentic Japanese cuisine since the lockdown started. Thank you for sharing this, absolutely loved it.
You are welcome Dimitri, Thank you for making Dorayaki with my recipe.
If I don’t want to use mirin, what ingredients should I use? thanks
I wasn’t too sure about the beans when I first tried it but since then, I’m hooked !
Fantastic 😀
Hi,
I have used 40ml of water for the batter after refrigeration and it has come out looking very watery. And from looking at your photos, your batter looks much thicker. I am not sure what has gone wrong as I have followed your exacts measurements.
Can you clarify where is the mistake? Thanks
Hi Cheryl, the amount of water is depends on the size of the egg you use. If you have good thick consistency, you may not need to add all 40ml. See the *note 1 in the recipe card.